Tint visualizer (shade preview)
Show a customer roughly how dyed, carbon or ceramic film at different darkness levels would look on a photo of their own car, and save the chosen look to the quotation.
What it is
The Tint preview (visualizer) lets you outline the windows on a photo of the customer's vehicle and darken them on screen to try different film types and shades. You can slide between Before and After, compare shades side by side, and save a look to the job.
It is a simulation. The screen simply darkens the glass you outlined. It is not a measurement of light, and it cannot show the exact result: that depends on the glass, the light and the film batch. The film's VLT (how much visible light passes through) is the figure stated by the manufacturer. Every saved image carries the stamp Simulated preview - not a measurement, and the quotation prints Previews are simulations on the customer's photo, not measurements.
Who uses it
- Front desk / salesperson: shows shades to a walk-in customer on a tablet or phone while preparing the quotation.
- Technician: can open it from a job they are on.
- Customer: can open it from the customer portal and choose a look themselves.
Why it matters
Customers often cannot picture "20%" or "35%". Seeing their own car darkened helps them choose with confidence, reduces "too dark / too light" complaints after the job, and often moves them to a better film. Their chosen look is saved on the job, so the technician knows exactly what was agreed.
How to use it
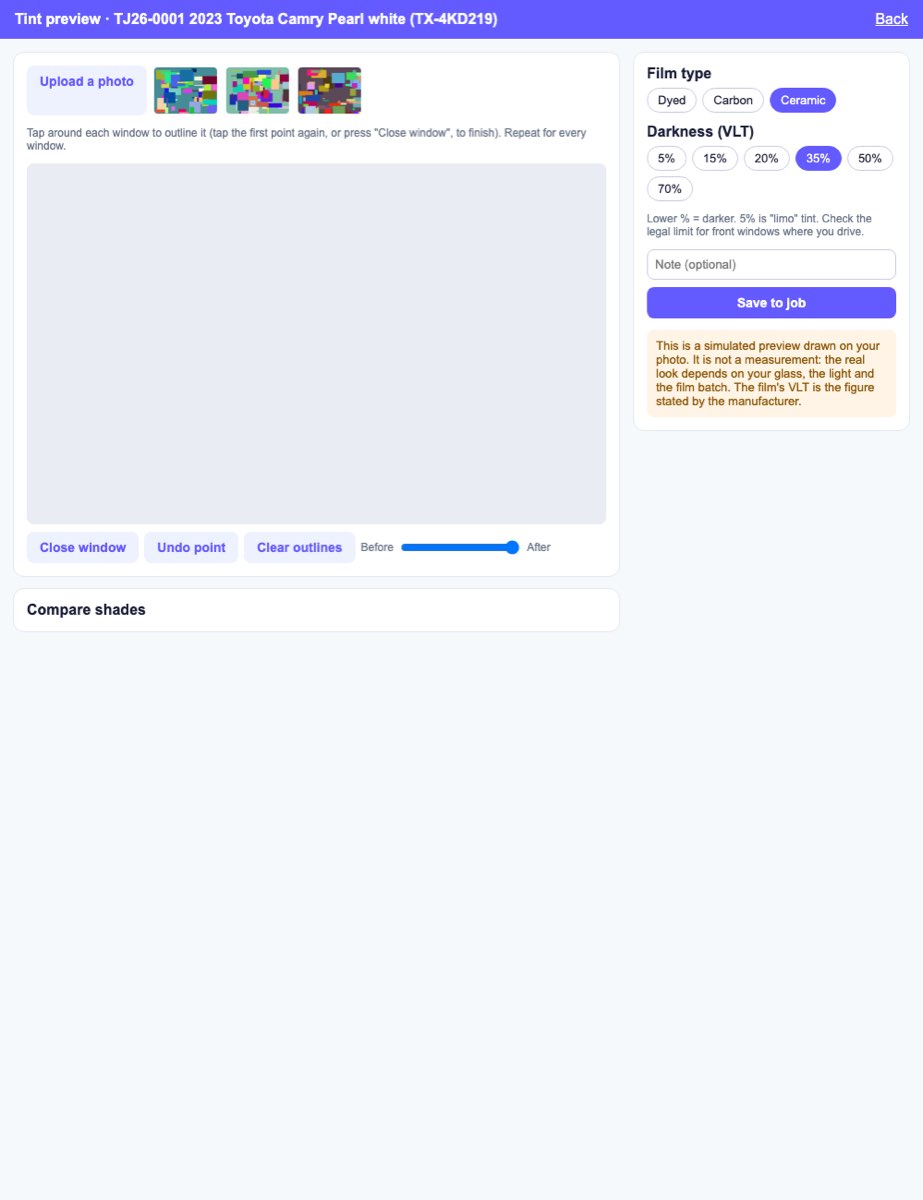
From the job (staff)
- Open the job: Tinting → Jobs & quotations → click the job.
- Press Tint preview at the top of the job card.
- Pick a photo: tap one of the job's before, during or product photos (Use this photo), or press Upload photo to take one with the camera or choose a file.
- Tap around the edge of the first window to outline it. Finish the shape by tapping the first point again or pressing Close window. Repeat for every window you want tinted.
- Undo point removes the last point (or the last window).
- Clear outlines starts again.
- Under Film type, choose Dyed, Carbon or Ceramic.
- Under Darkness (VLT), choose 5%, 15%, 20%, 35%, 50% or 70%. Lower % = darker; 5% is "limo" tint.
- Drag the Before / After slider to compare with the untinted photo, and look at the Compare shades strip to see all darkness levels at once.
- Optionally type a Note, then press Save to job. The message Preview saved to the job. confirms it.
- Saved images are listed under Saved looks, marked staff or customer, and chosen for the customer's pick.
From the customer portal
- In their portal, on an automotive job that is a quotation, approved or scheduled, the customer presses Preview tint shades on your car.
- They follow the same steps, using photos the shop has shared with them or their own upload.
- They press Choose this look. They see Saved - we will see your choice on the quotation. Their newest choice replaces any earlier one as the chosen look.
On the quotation
The printed quotation (quotations and jobs) shows up to four saved previews under Tint preview, the customer's chosen one first, with the simulation note.
Rules & limits
- Staff can use it on any job in their business; technicians reach it through jobs they can open. Deleting a saved preview is a staff action.
- In the portal, the button only appears for automotive jobs at quotation, approved or scheduled status, and only photos marked to share with the customer are offered.
- At least one window must be outlined before saving: Load a photo and outline at least one window first.
- A job can hold up to 30 saved previews (This job already has 30 saved previews.). Each image can be up to 8 MB and counts toward your storage allowance (usage limits).
- Some photos from other websites cannot be saved: This photo cannot be saved from here; upload it from your device instead.
- The film types are only Dyed, Carbon and Ceramic, and the shades only the six listed above.
Tips
- Take a clear side-on before photo first (photos); it gives the best preview and is already on the job.
- Tell customers about legal limits for front windows in your area. The screen reminds them too: Check the legal limit for front windows where you drive.
- Show a sample of the real film after the preview; the preview is a guide, not a promise.